So I understand that wooden boat builders (and maybe woodworkers in general) have this concept known as the "Moaning Chair". It's where you sit and contemplate your latest really serious screw-up. Sooner or later everyone gets their turn, and mine was today.
See, the top of the cabinet and the shelf across the middle (which forms the bottom of the actual humidifier and guitar display portion) each have a 2x4 running across the front. This provides stiffness and room for lighting and space for the glass doors to run in. The three cross-pieces (the base, the shelf, and the top) were all carefully cut to 54" wide, that being my determination of the optimal width in which to hang eight guitars without having them too close together or making the cabinet really huge. I mean, I still need space for bookshelves on either side, right? (To say nothing of the mini-bar.)
The tricky part, though, is that the 2x4 on the shelf has to have space cut out for the stiffeners on the sides of the cabinet... whereas the 2x4 on the top is supposed to overlap the sides (the stiffeners butt up against the top 2x4). So I carefully calculated the amount of 2x4 that would fit between the stiffeners (this is last Wednesday)... and then cut the whole thing off that length, which is a bit under 53". And
then made cutouts for the stiffeners. I did this, you see, because I am dumb.
Now, it wasn't the end of the world; we hadn't assembled the shelf or the top. It was a pretty simple matter to trim the other pieces accordingly, and we were back on track in half an hour or so. I've lost around an eighth of an inch between guitars, which isn't great but should still be OK. Mostly, it's my pride that was injured.
HOWEVER! The rest of the day went well, and we got the shelf and top assembled. Yes, the lengths are all correct now, thank you for asking. We then drilled all the holes for the quick-connect system. There are a lot of them, 72 to be exact, and we got all but
one in the right place. I blame Dad, he had the drill and he's not here to dispute whether it was my marking of the hole or his placing of the drill...

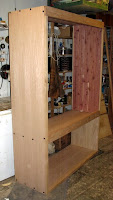
Anyway, holes all drilled, we dry-assembled the sides, base, shelf, and top, and by Crom it actually went together! I offer you pictures as proof. It's actually looking like it should. Er, maybe an inch or so narrower than planned.
Somewhere in there we also started laminating the curved hangers that will suspend the yokes (these fit snugly around the neck of each instrument where it swells out to form the headstock) directly below a bolt in a T-track along the inside top. All eight should be laminated by the end of the week.
Next we attach the back, finish the cedar lining, test the doors (which I pick up from the glass place tomorrow), and then disassemble the whole thing for finishing.
 First, here is a shot of the laminated ash yoke holders ("hangers" or "hockey sticks") after their second coat of varnish. I really like how they came out, and if they end up being stiff enough, I may not even need retaining rings on the yokes. Oh yeah, that's a boat in behind there... remember the boat? I'll be back working on the boat next week.
 The second shot (taken a couple of days earlier) shows the major pieces assembled (sides, base, shelf, top, and doors). After testing the doors and installing the cedar on the top of the shelf, we took the whole thing apart for light installation, hole filling, and a couple other small jobs. Then it was final sanding and first coat of varnish, which is now on.